Dec 28, 2018 I have used it to install Windows a zillion times. I have USB 2.0 pendrives but they are very slow when copying or reading files. So I decided to use my external hard drive as the installation media to install Windows 10 on my new laptop. Here are the steps I took to successfully install Windows 10 using an external hard drive. Jun 01, 2020 The version of macOS offered by macOS Recovery might vary in some cases: If macOS Sierra 10.12.4 or later has never been installed on this Mac, Option-Command-R installs the macOS that came with your Mac, or the closest version still available. And Shift-Option-Command-R isn't available. If you erased your entire disk instead of just the startup volume on that disk, macOS Recovery might. But the reality is quite different. Whether it is a hard drive or USB or internal drive, Mac uses different format support. So, you can’t simply use the same drive with both Windows and Mac. As a result, you will need to format the hard drive for Mac. Using the Mac preferred file system is important otherwise the files will be of no use to you.
The installation of macOS Mojave 10.14 on an external hard drive or solid state drive (SSD) is quite simple and straightforward. Most importantly, it doesn’t damage your PC or current Windows installation if you carefully follow the instructions in this video. To assist you better, we have also added a video guide at the end. So all you have to do is follow the steps mentioned below to install the latest macOS Mojave release on any external SSD or portable hard drive.
Then, either use or so you’ll be ready to install macOS onto your new drive and migrate your data afterward.If you are happy with your existing operating system installation and would simply like to upgrade your hard drive capacity, you can clone your existing hard drive to your new drive.To clone a hard drive, you will need a way to connect the second hard drive to your Mac. 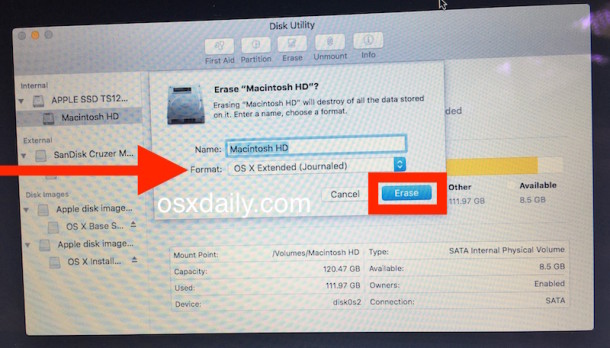
Steps to install macOS Mojave on External Drive
Steps to install macOS Mojave on External Drive
Step 1: Things You Need
- A USB 3.0 8GB Flash Drive
- An external hard drive or SSD with a USB 3.0 connector/enclosure (see the above picture)
- A Mac computer/Macbook or access to Hackintosh PC
- TheEFI folder with right config.plist file
- Patience (sometimes a lot)

Before You Begin
Make sure the external hard drive or SSD does not contain any data as we will be formatting it. Best free mac cloning software. If it contains any data, backup it. The same goes for the USB 3.0 8GB stick.
New Hard Drive Os Install
Step 2: Prepare macOS Mojave Installer
Install Osx On External Hard Drive Using Windows
- Open App store on a Mac or Hackintosh and download Mojave Installer (It’s Free)
- Open Disk Utility and connect the USB 3.0 8GB flash drive
- Select it and click Erase
- Enter a name, eg. MojaveInstaller and choose macOS extended Journaled. Click ‘Erase‘
- Now connect your external hard drive or enclosed M.2 or SATA SSD and click ‘Erase‘
- Enter a name, eg. Mojave HD or Mojave SSD (if using SSD). Choose APFS from the format and click ‘Erase‘
- Now close Disk utility and Open Terminal app
- Type following command assuming your USB 3.0 8GB thumb drive name is MojaveInstaller. Replace MojaveInstaller if you have given a different name to your USB stick
- After entering the command, press Enter/Return and wait for it to finish
- In the Terminal Window, type diskutil list and note down the disk no. of your USB 3.0 *GB Flash Drive and your connected external hard drive or SSD
- Then download the EFI mounter app and double-click to open it
- Enter the password and double-click the drive number that you saw in the Terminal against your Thumb drive volume
- Open Finder and click ‘EFI’ partition
- Paste this EFI folder inside the partition.
Important: The EFI folder we shared works for Dell 7560/7460 and a few other laptops powered by Sky Lake, Kaby Lake, and Coffee Lake i5 and i7 processors. However, you can always edit the EFI folder’s config.plist file according to your system hardware. To know how to edit the config.plist file as per your system hardware, visit this link - Once EFI folder with edited config.plist is pasted in the ‘EFI’ partition of your USB flash drive, eject the partition
- Make sure your external hard drive or SSD that we formatted earlier is connected to the system; Once again, double-click EFI Mounter app to run it and enter the password when prompted.
- Now choose the drive number that was shown against your external hard drive or SSD in the Terminal command that you entered in step no. 10
- Open the Finder and click EFI. Paste the EFI folder here
- Now that you have prepared the installer and installation drive, go to your PC or Laptop where you will be running macOS Mojave and connect both drives
Step 3: Installing macOS Mojave
- Turn on PC and access BIOS. Use this link and configure BIOS settings for macOS installation
- Once BIOS is configured, save the settings and restart the system. As soon as system boots, start pressing F12 key continuously to Enter the Boot option key
- Choose the Flash Drive from the option and click ‘Enter’
- On Clover screen, select Install macOS from Mojave Installer and press Enter
- Wait for the installer to load files. If system restarts, boot using verbose and report the issue with a screenshot, system details via comments down below
- Now Click ‘Install macOS’ and then agree to the terms and conditions
- Choose the external drive that we named ‘Mojave HD’ or ‘Mojave SSD’ in step no. 6 and click ‘Install’
- Wait for the installer to finish and restart the system. As soon as system restarts, start pressing the boot options key usually F12 and choose your external drive from the option and press ‘Enter’
- Let it boot and install the macOS Mojave on your external hard drive or SSD (whichever you using). At this stage, you can remove your USB 3.0 8GB Flash drive
- After installation is done, the system will reboot and again you need to press boot options key to choose your external drive as boot drive where you just installed macOS Mojave
Tip: You can set your external hard drive or SSD as default drive from BIOS settings. refer to your user manual or manufacturers website to know how to set boot priority order. You can also visit this link to know how it’s done. - Now setup your macOS Mojave OS and choose between light or dark mode
Voila! At this stage, you have successfully installed macOS Mojave on an external drive. To boot macOS, you can either use Boot Option key or set the drive as default drive via Boot Priority order in BIOS.
M audio firewire 410 driver mac os x 10.9. OS You must select a operating system Latest Updates Driver Updates ProductVersionDateFile DownloadFirmware Updates ProductVersionDateFile DownloadAccent Module1.00.09Code 251.3.0 (FW v1.0.4.4)Code 491.3.0 (FW v1.0.4.4)Code 611.3.0 (FW v1.0.4.4)Code 251.3.0 (FW v1.0.4.4)Software Updates ProductVersionDateFile DownloadHammer 881.0.8Code 251.0.8Code 491.0.8Code 611.0.8Hammer 881.0.7.
Watch this step-by-step Video Tutorial
Wrap Up
I hope this guide has been helpful in guiding you installation of macOS Mojave on an external hard drive or SSD. you can use Any hard drive, however, we would highly recommend you to get an SSD at least 128GB available for just 000000 and enclose it under an HDD enclosure. You can also opt for M.2 SSD which looks like a giant USB thumb drive with USB C Type port. here’s what we use. This is the best combination, small, light, and highly portable. You can buy an M.2 SSD at the same price and enclosure for Just under 10 USD using this link.
Good luck. Share your thoughts and do follow us on Facebook, Twitter and subscribe to our YouTube channel for Video guides and tutorials. We will bring more such guides and solutions for issues related to Hackintosh. happy Hackintosh!
